
How to Shoot "Over Under" Images
How to Shoot “Over Under” Images
A lot of people regularly ask if my “over under” images are photoshopped. My answer to them is no they are not. Although you can make over under images in Photoshop by blending images, all of my work is completely captured in camera with no image manipulation. A true natural representation of what I capture when I am in the ocean photographing.
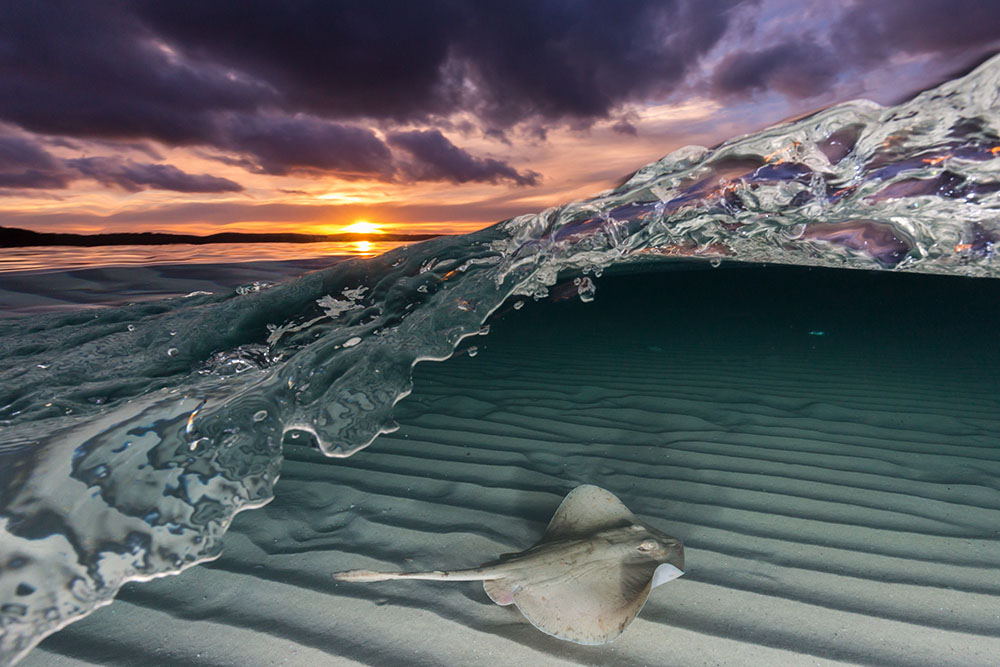
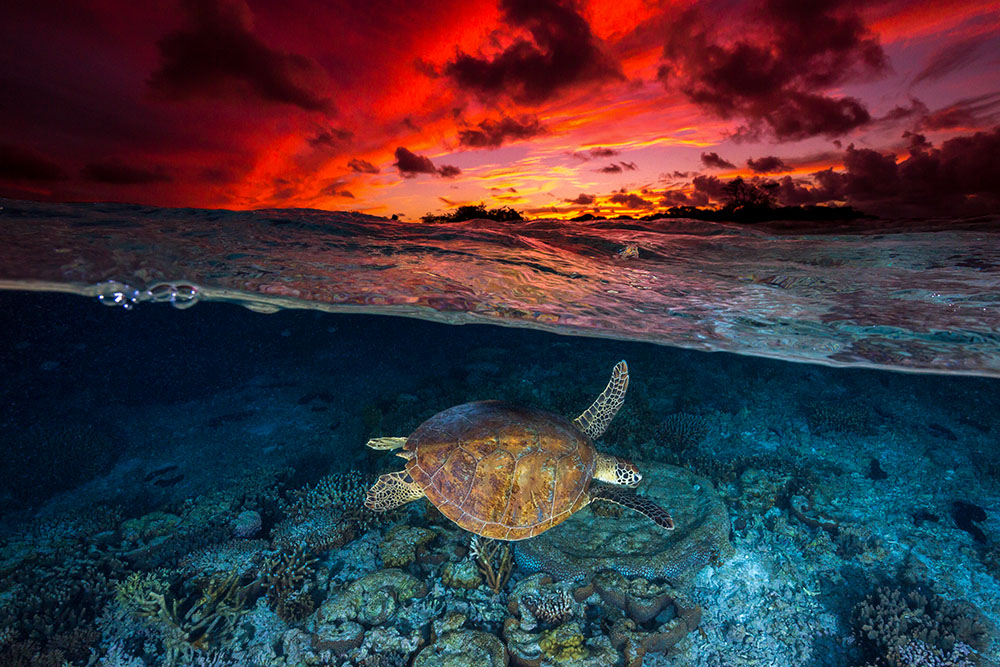
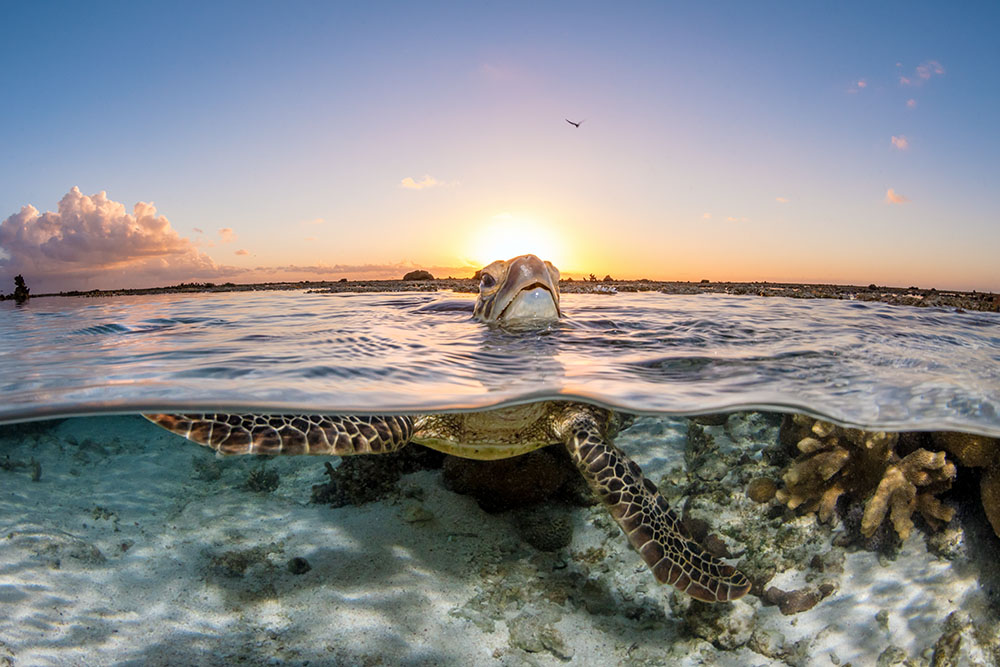
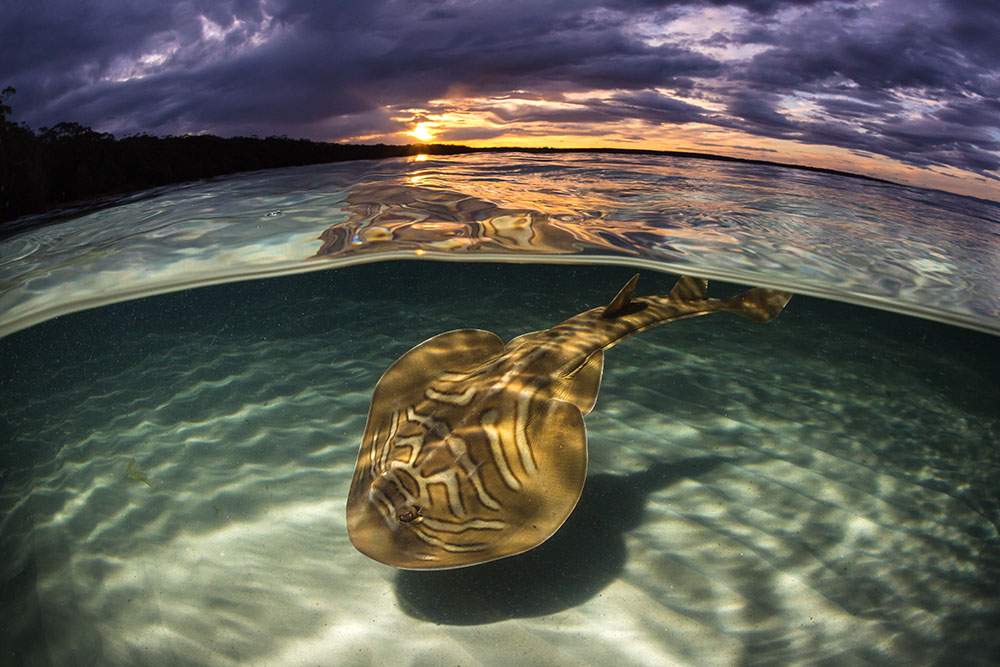
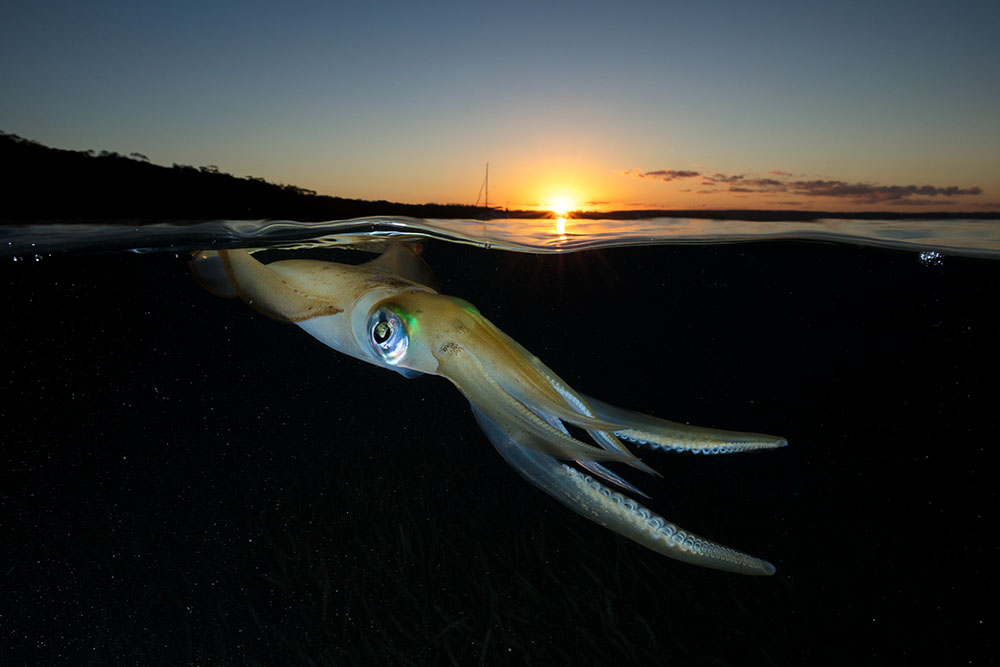
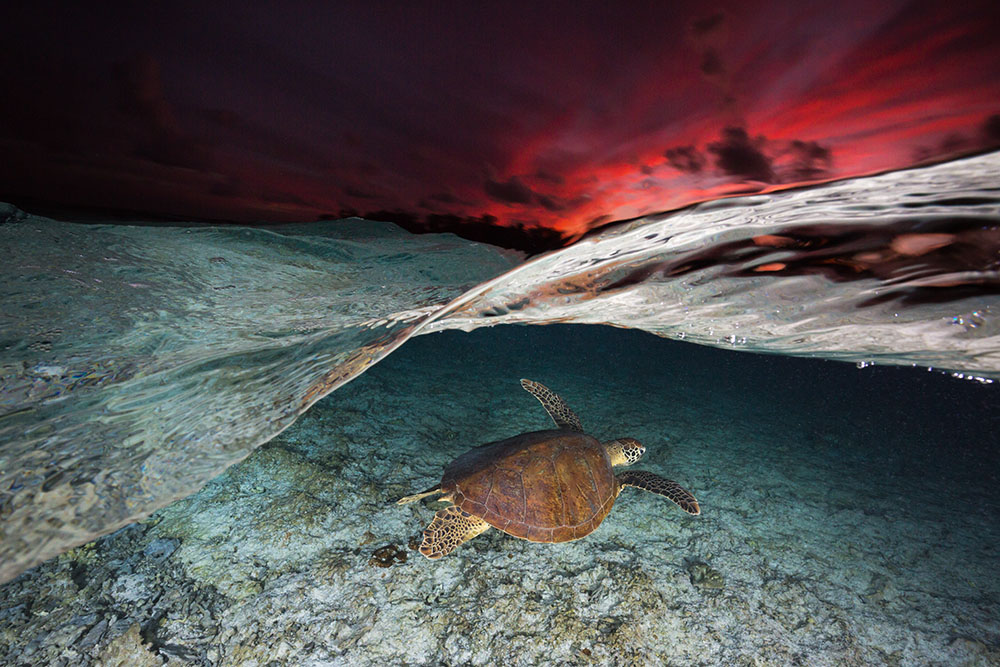
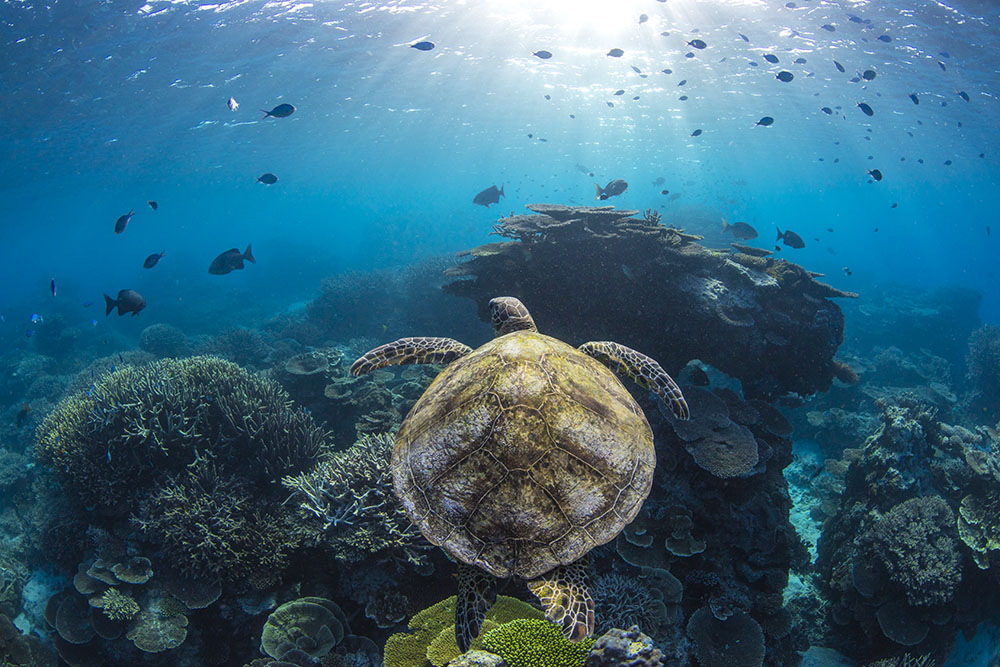
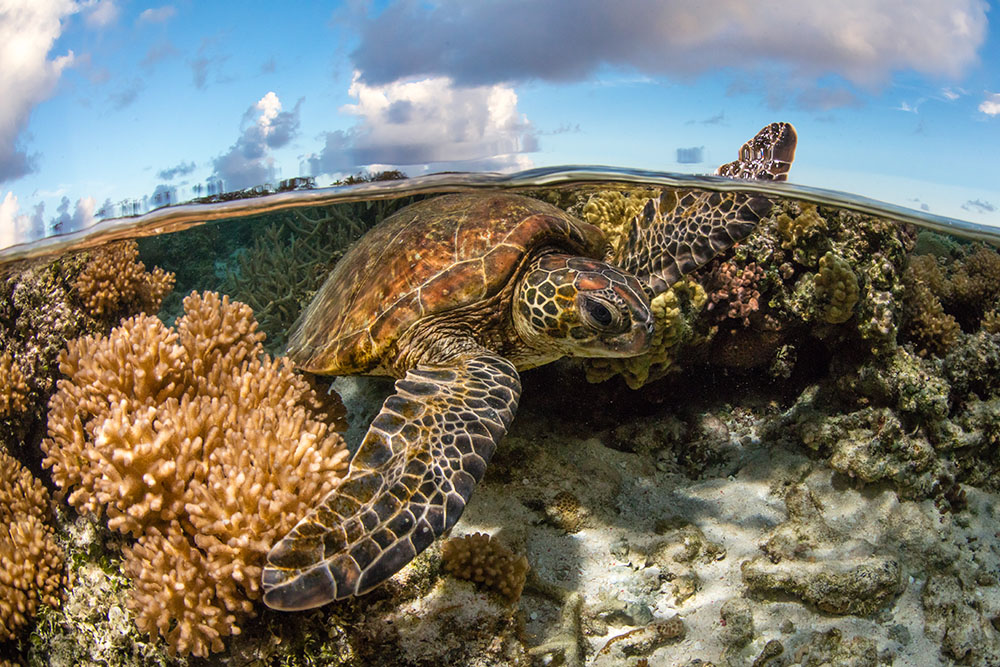
An over under, also called a “split shot” or “split image” is a style of underwater photography where you capture an image where you can see above and below the water captured in a single exposure. In the top half of the image you can see above the water and in the bottom half of the image you can see below the water.
For me the over under is my favourite kind of underwater photography. It is a very unique style of photography which gives you an image that helps to connect the familiar terrestrial world with the unfamiliar marine world. My favourite time to shoot over unders is on sunrise or sunset to capture atmospheric skies paired with the marine life that lurks below the water’s surface. The over under is a difficult image to capture, but like anything practice makes perfect. There is a bit of gear required and specific settings which help making capture over under images easier. I am going to be showing you the technique, gear and settings I personally use to capture my over under images.
What You Will Need For Photographing Over Under Images.
· A DSLR, mirrorless camera or a compact underwater camera such a GoPro.
· An underwater camera housing to allow you to use your camera in the water. I shoot with AquaTech underwater housings and highly recommend them.
· An ultra-wide lens. For full-frame I recommend using 16-35mm, 14mm or 15mm fisheye.
All of these lenses will give you a super wide field of view which is essential for shooting over under images. For APS-C sensor 10-18mm or 8-15mm fisheye would be ideal. A dome port on the front of the camera is essential for shooting over unders, I shoot with an 8” dome port. You can use a flat port but it is much harder and you will never very calm water.
An underwater flash or strobes. These are essential if you are planning on shooting over unders on sunrise or sunset to balance the exposure of the foreground with the sky. Shooting over unders during the day time do not require the use of strobes or flashes. When I am shooting over unders I will often be in the water for a long period of time so I wear a wetsuit to prevent heat loss. A mask, snorkel and fins are also required.
List of Equipment I Shoot Over Unders With
- Canon 5d MK 3
- Canon 8-15mm f/4 Fisheye
- Canon 16-35mm f/4
- AquaTech 5D3 Elite Underwater Housing
- AquaTech 8” Dome Port
- AquaTech PX-30 Port Extension
- Canon Speedlite 580EX II
- AquaTech Speedlite 580EX II Flash Housing
- 2x Inon Z240 Strobes
Planning
There is a bit of planning involved with shooting over unders. Firstly, you need clear water, if the water is murky or dirty I won’t bother shooting. A local knowledge of the area you are shooting in is also essential. A knowledge of how swell, wind, tides and currents will affect the visibility of the water is required. Weather conditions when the wind is light and the swell is small make the perfect conditions.
Calm bodies of water make shooting over under images much easier. Sheltered beaches, lagoons, rivers and protected bays are ideal places to shoot over unders. It is always good idea to check a location first to see if it is a suitable place to shoot. Entering the ocean is always a risk so ensure you are a capable swimmer and never go out shooting in dangerous conditions beyond your capability. The conditions on the ocean can change rapidly so make sure you always check the weather and surf forecasts before you go out shooting.
Settings
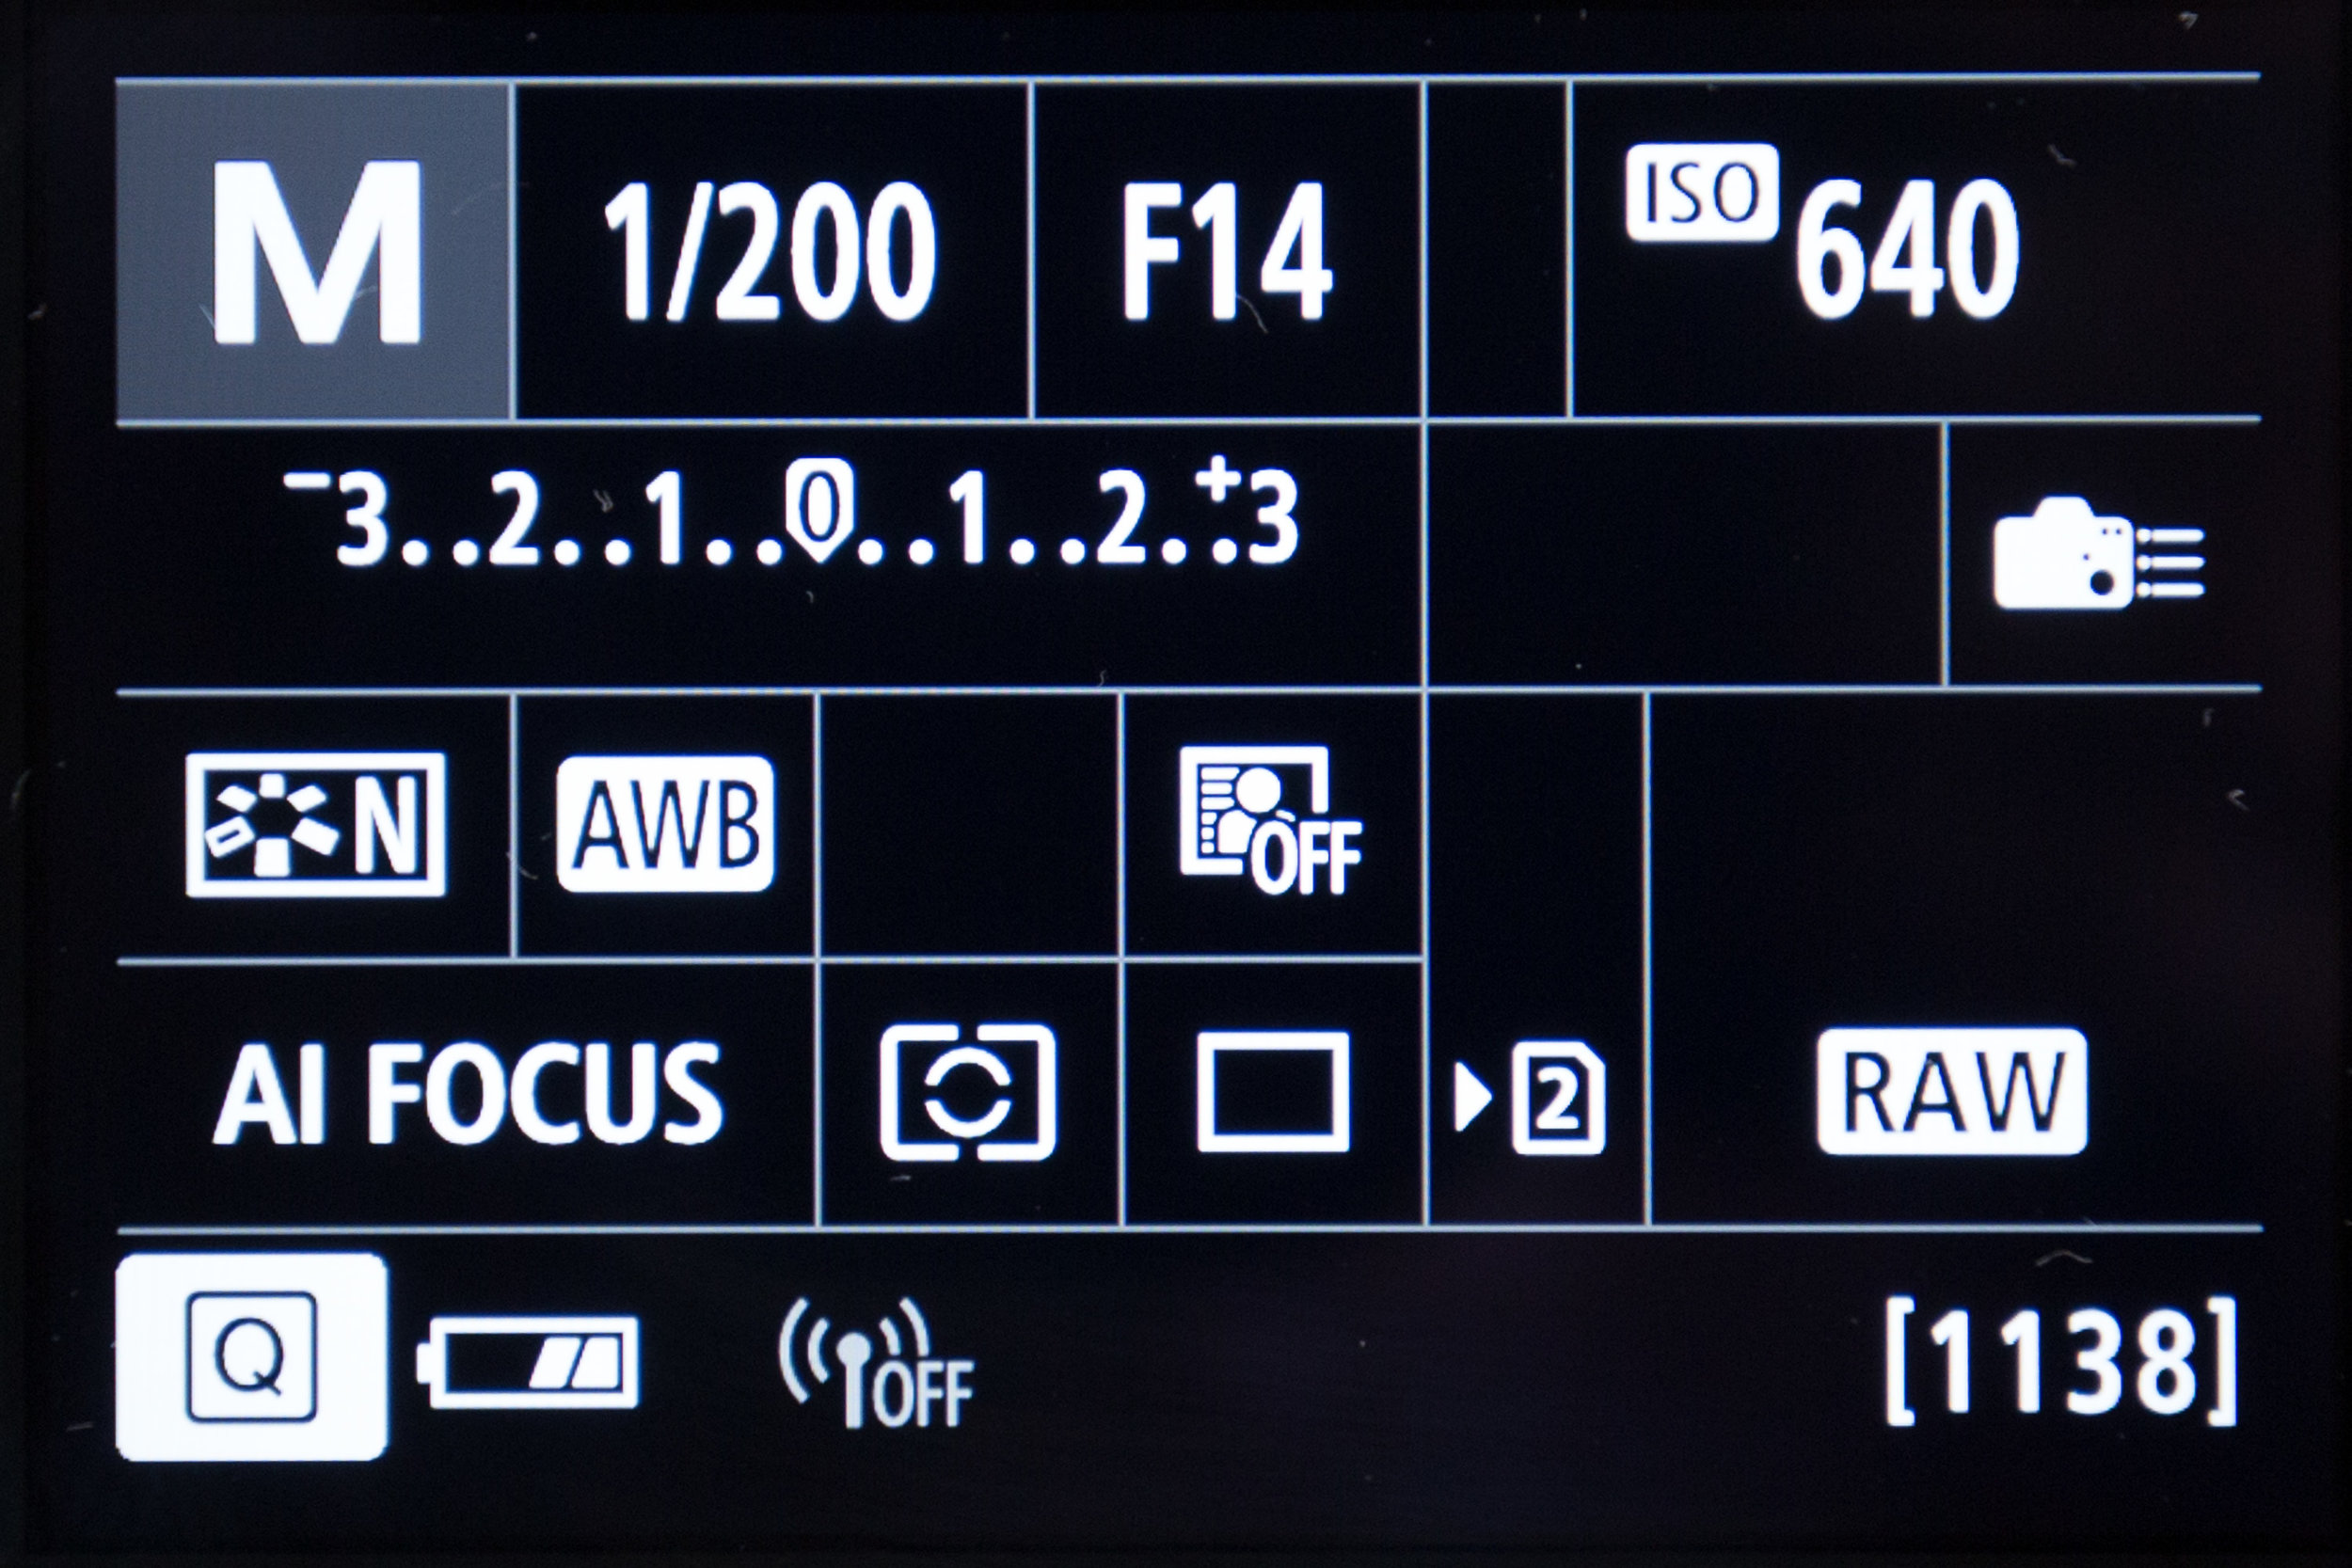
When shooting over unders I will only ever shoot in manual, especially when shooting on sunrise and sunset when the light is ever changing, you want to be able to easily make adjustments on your camera accordingly. For sunrise and sunset as a rule of thumb I will have my camera set to f/14, ISO 640, 1/200sec.
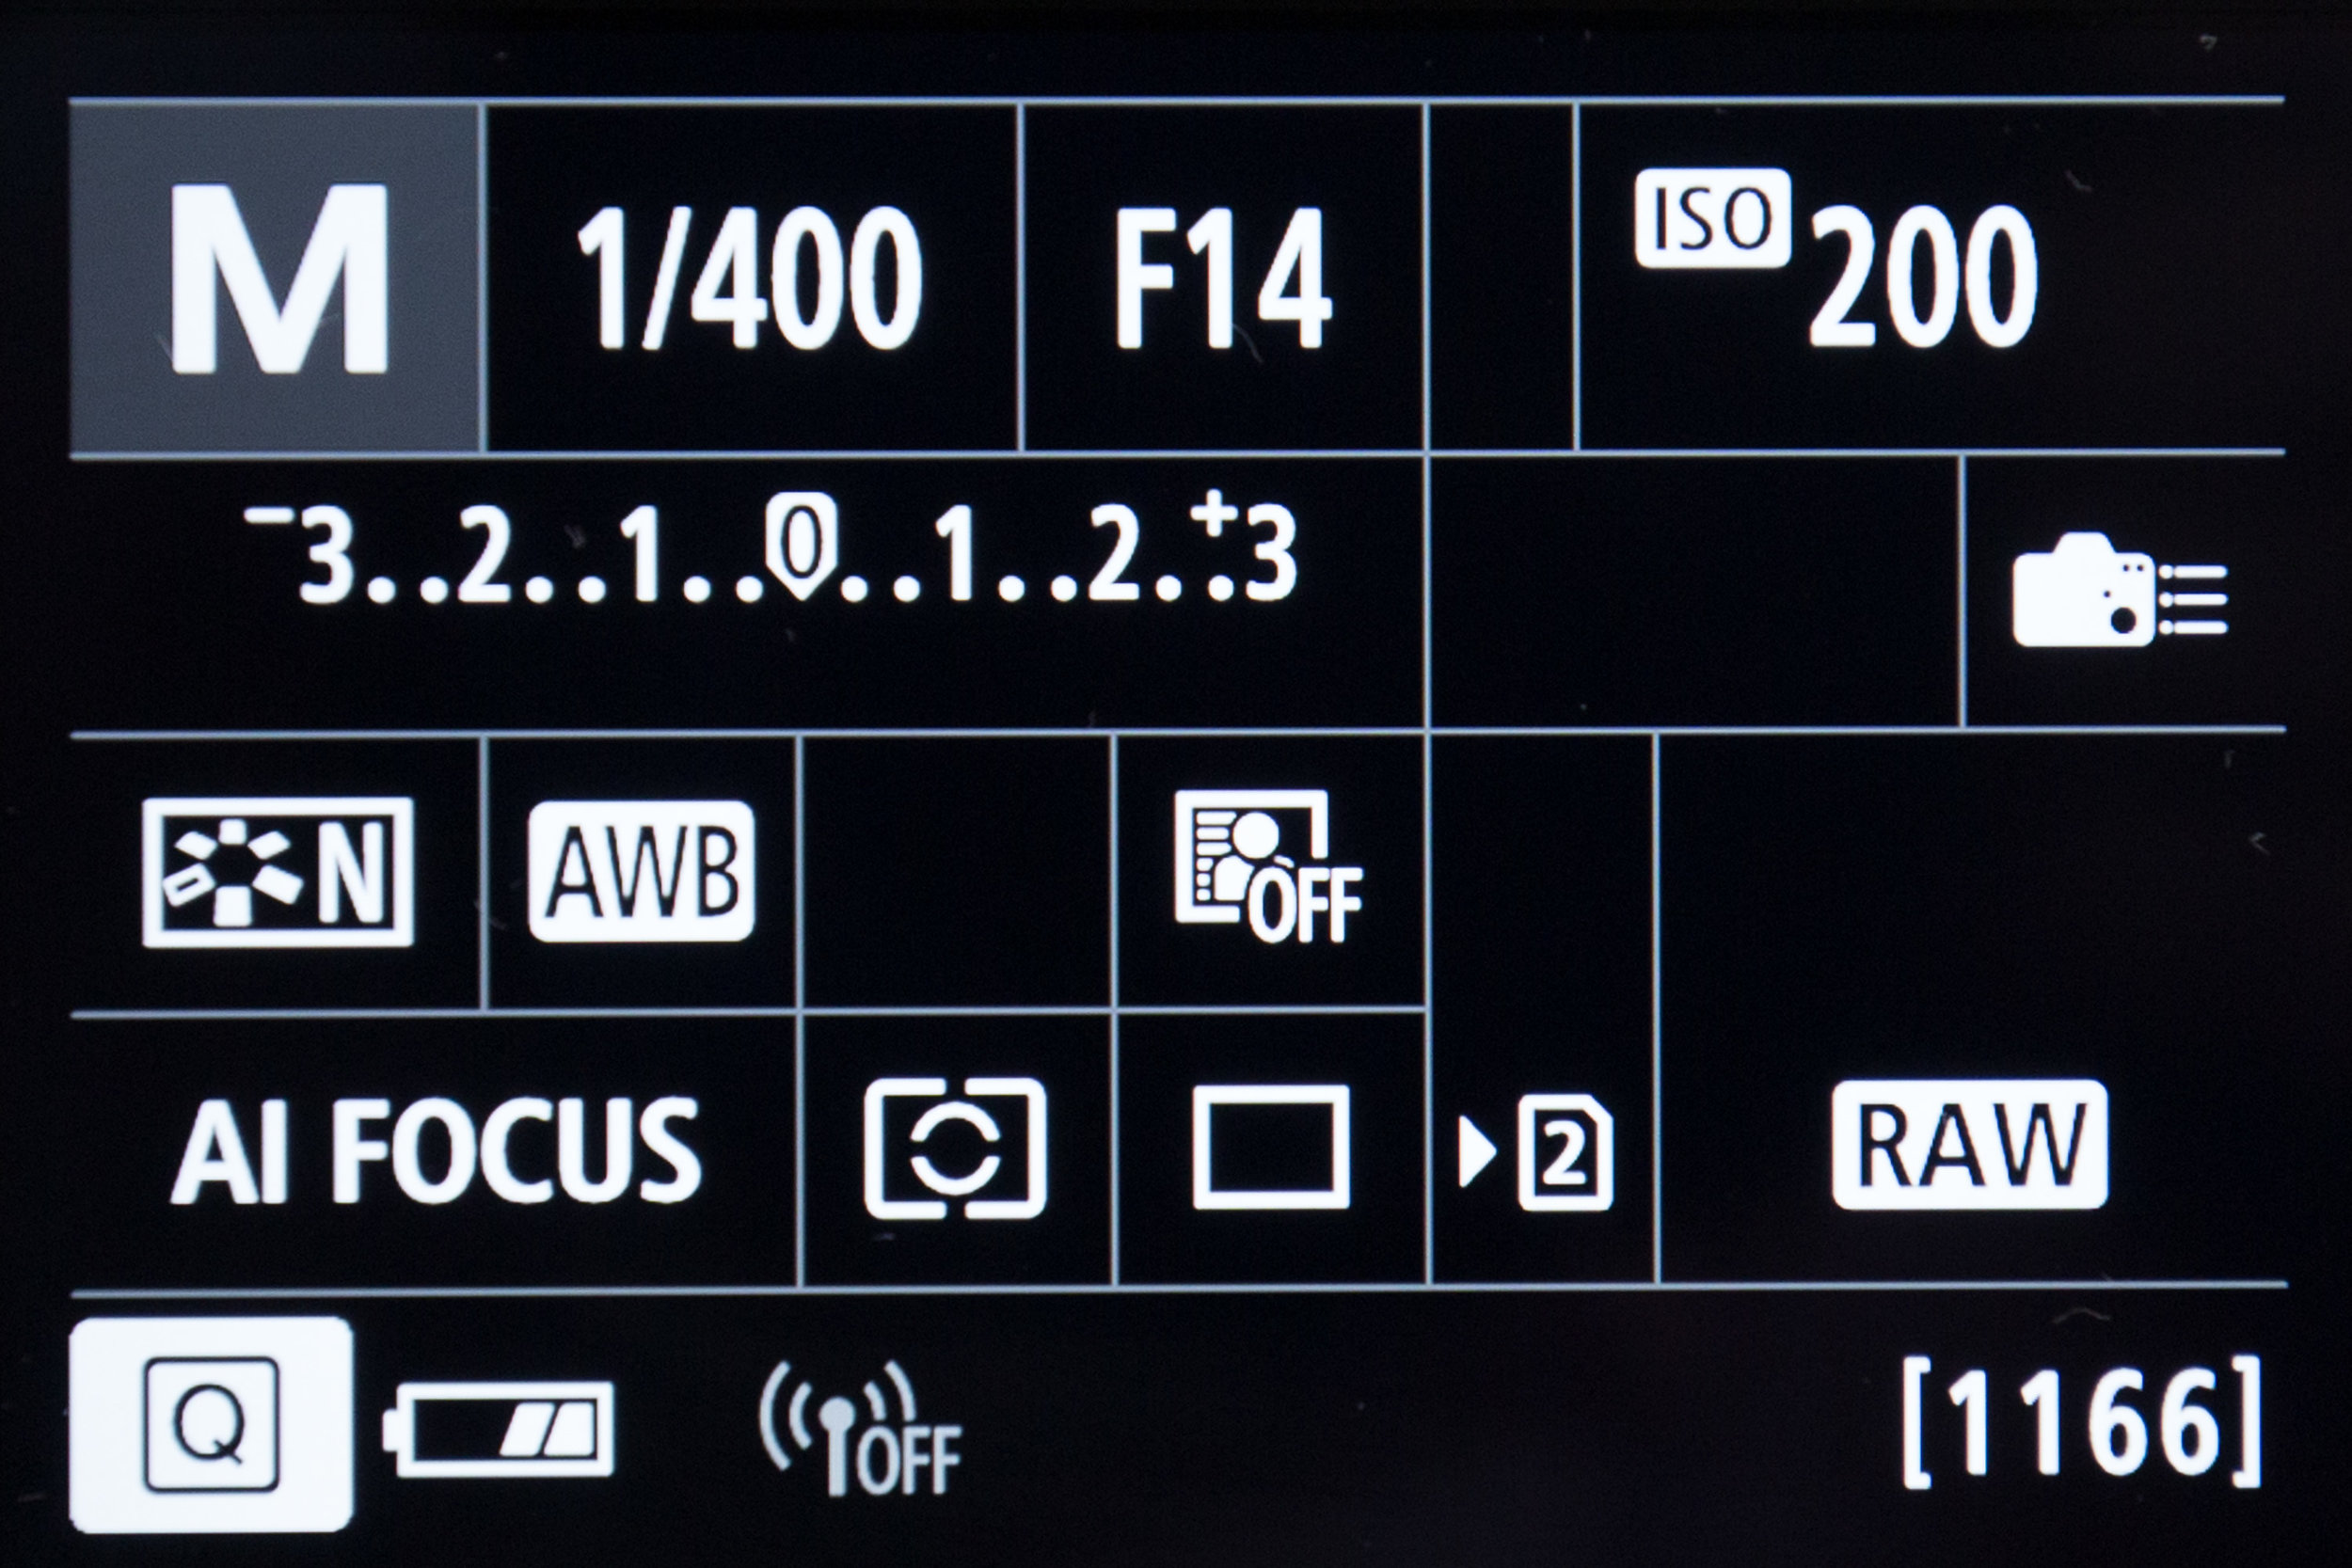
For day time, I will have my camera set to f/14, ISO 200, 1/400sec. I will then take a test shot and adjust the ISO and shutter speed accordingly to get the correct exposure. When shooting with strobes or flashes I also have them set on manual and adjust accordingly to get the correct exposure, either increasing or reducing the output of light. I never shoot with auto settings on my flash as it will often overexpose and blow out highlights. When shooting with flashes and strobes it is easy to overexpose your foreground so make sure you check your histogram to make sure you’re not blowing out any highlights.
Aperture
When shooting over unders I shoot anywhere between f/11 all the way down to f/22, this will give you a good depth of field throughout the photo. I find that f/14 is the sweet spot for my 16-35mm f/4 and 8-15mm f/4 fisheye. Each lens will have a different sweet spot so experiment using different apertures till you find out what works best for you.
Shutter Speed
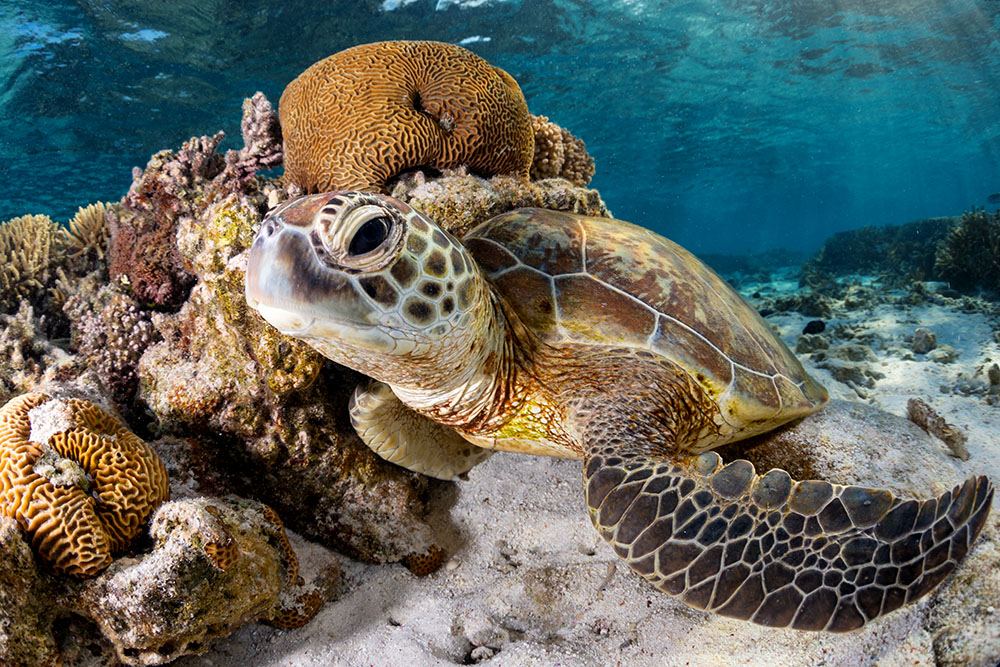
When shooting with strobes your sync speed will all depend on the camera you’re shooting with. I shoot with a canon 5d Mk 3 which has a sync speed of 1/250sec. I will shoot between 1/250sec down to 1/60sec. I don’t shoot any slower than 1/60sec otherwise you will have too much camera shake and get blurry images. Shooting on sunrise or sunset 1/200sec and 1/250 sec are the shutter speeds I shoot with the majority of the time. If you are shooting during the day and shooting a static scene where there isn’t much movement use a shutter speed of 1/125sec or faster. For shooting moving subjects such as a turtle or a stingray use a shutter speed of 1/400sec or faster to freeze the movement.
ISO
Shooting on sunrise or sunset I will use an ISO of 640 up to 1000. You can also shoot at higher ISO depending on how your camera handles the noise. During the day time, I shoot with an ISO of 200-400. If I am shooting a slower shutter speed I will lower the ISO and for shooting a faster shutter speed I will increase the ISO accordingly.
Focusing
I have my focus set up with one focus point right in the middle. I will always look though the view finder to make sure I am getting an accurate focus. When shooting in low light such as on sunrise or sunset I will focus using the live view on my camera or use a torch and aim the torch to where I want to focus. When shooting with a fish eye you can have the focus set to infinity.

Tips
When you are shooting over unders I can guarantee that you will always get water droplets form all over the dome. To reduce water droplets forming I will cover the dome in a layer of saliva and leave it to dry over-night. Then when you are out shooting remove the saliva so the dome is nice and clear, this will help minimize the water droplets on the dome. Before you take a photo give the housing a quick dunk under the water then take the shot so you don’t have water droplets on the dome.
After every use (especially in saltwater) make sure you wash your housing in fresh water and let it soak for about 30mins submerged in fresh water to remove any salt build up. Always make sure any rings on your camera housing are lubricated with silicone grease and are free of debris such as sand or hairs.
Each time before you shoot submerge your camera housing below the water and hold for 10 seconds to make sure you’ve got a water tight seal and no water is leaking into your housing. If you treat your housing well, it will treat you well for many years to come. So, get on out there in the water and get shooting!

The next step now that you’ve got your camera settings all set, you want to submerge your camera and housing half below the water so there is an even balance above and below the water. I look through the view finder at all times to ensure I have an even balance above and below the water. Next step is to fire the shutter and there you go you’ve captured an over under image! Well done!
You might be a little disappointed at first but like anything practice makes perfect and overtime you will find out what works best for you. If you have any questions, please comment below and I will be happy to answer them.