
How to shoot panoramic photos. A tutorial from shooting to editing.
Shooting panoramic photos
Sometimes a landscape can be really overwhelming and beautiful, but when photographing such a scene, you might get disappointed. Imagine standing on top of a huge cliff overlooking the landscape. The view is absolutely breathtaking, but your images turn out rather boring. The result doesn’t look anything near what you see with your own eyes. How is this possible you might wonder. The explanation is that our field of view is much wider than the single frame from your camera. An ultra-wide angle lens will do the trick you might think! But if you would use, lets say a 14 mm lens in order to widen the field of view, everything will look small and far away. This of course reduces the impact of the photo too. So, what can we do to capture an image that is as stunning as the view itself (read: almost.. nothing is as stunning as being actually there of course). The answer is quite simple, we make a panoramic photo!

This panoramic image of Kvalvika and Vestvika beach, consists of three overlapping portrait oriented photos. I forgot my remote trigger so I had to use the 10 second timer and run to get the last frame. Tamron SP 24-70 F/2.8 @ 24 mm | F/9 | 1/13 sec | ISO 100
In this post I will try to explain how I make panoramic photos. I will talk about the things you have to keep in mind, and finally, I will show you how I stitch my images using Lightroom. There is plenty of good software that will do this for you, but I think Lightroom does an amazing job with just a few clicks.
Method
There are devices like smartphones and compact cameras that are capable of making panoramic photos by simply panning the camera along the horizon. This works fine if you just want a nice holiday photo, but we are going to focus on taking a panoramic photo with a dSLR. As with normal photos, you’ll get the best results when photographing in Raw. The file with get a lot bigger but you will have a much more information to work with, resulting in a higher quality panoramic image when post-processing.
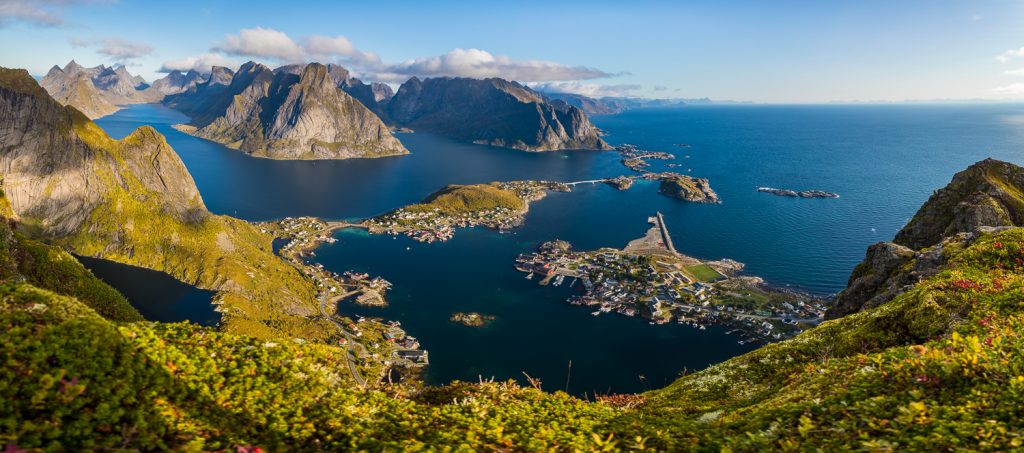
The view you get when standing on top of Reinebringen is so overwhelming that a single-frame-photo won’t do it justice. Five images shot with a Tamron SP 24-70 F/2.8 @ 24 mm | F/9 | 1/125 sec | ISO 100.
When taking the photos for the panoramic, you can do two things. One, you can put your camera into landscape orientation, or two, you can put your camera into portrait orientation. Would you be shooting a panoramic image in landscape, the result will be a narrow image (less sky and foreground, lower resolution, lower margin of error in post). Whilst shooting in portrait mode will result in a broader panoramic image (more sky and foreground, higher resolution, higher margin of error in post). More of the sky and more foreground can make for a much more impactful image. A downside of this method is that it requires more photos (and thus a higher chance of making mistakes), and because of this the file gets much larger.
Level your tripod
If you want the photos to aline perfectly, you need a sturdy tripod. The next step is to make sure that the tripod is leveled. Most high-end tripods have a waterlevel which can be used to do this. It requires some practice but trust me, it’s really useful and worth your time. If the tripod is leveled, your photos will be straight and stitch perfectly without losing much of the top and bottom. If you have enough margin of error, you can come away with losing some of the photo, but sometimes you need the whole frame to fit everything. I learned this the hard way and had to trow away one of my panoramic images because my tripod wasn’t leveled!
Next to having your tripod leveled, it is important that your ballhead is straight. This way the horizon will be straight. Most ballheads have a waterlevel making it as easy as leveling the tripod. But a lot of ballheads (especially the cheaper ones) have a waterlevel that only works in landscape orientation. This means that if you want to shoot in portrait orientation, you need to use an L-bracket to be sure the horizon is straight. You can read this article for an explanation.

A beautiful early winter morning. When shooting panoramic photos like these, make sure your image doesn’t get too dark when moving away from the sun. Of course, de difference in light is something natural and is a consequence of the sunrise, therefore part of the difference should be left untouched. Five images shot with a Tamron SP 24-70 F/2.8 @ 24 mm | F/11 | 2.5 sec | ISO 100
Using filters
You can use filters when making a panoramic image but you have to be careful. With every shot you take, make sure to check whether the filter still does what is supposed to do. The filters I use the most are gradual ND filters and a polarizer.
Gradual ND filters
When you pan the camera, the relative angle with the horizon changes. And, as a consequence, the position of the gradual ND filter. This means you have to correct for this by adjusting the position of the filter. When using a medium- or soft edge filter you will get away with this but when using a hard edge filter a slight shift will introduce an error immediately. If this goes unnoticed, it will ruin your panoramic image. Furthermore, some parts of the photo may become too dark (if you pan away from the sun for instance) and you might need to swap the ND grad filter for a lighter one.
Polarizer
Another filter that might introduce errors is the polarizer. Although fantastic in landscape photography, you need to pay extra attention when using this filter for panoramic photography. The reason for this is that the strength of the polarization depends on its angle with the sun. The filter is at its strongest when in a 90 degrees angle, thus when moving the camera either towards or away from the sun, you have to correct this by adjusting the polarizer. If you forget this you will get a dark area in your stitched panoramic.

The arrows mark a dark area in my photo. This is caused by the polarizer, I had forgotten to adjust my polarizer while panning. This illustrates that you have to adjust the amount of polarization when panning.
In order to know where the darkest spot (the 90 degree angle) will be, you can form a pistol with your thumb and index finger and point towards the sun. Keep pointing straight towards the sun and If you now rotate your hand clockwise or counterclockwise. Your thumb will point towards the area with the maximum amount of polarization. Take this into account when making your panorama and check with every photo. It would be such a pity if you get home and discover an ugly dark spot in your photo like the one shown above.
Exposure
When shooting panoramas in low-light conditions, for instance at sunrise, the difference between the image closest to the sun and the image furthest away, can be too big. If this happens, you can balance the exposure by adjusting your exposure. This can be done by adding stops (1 stop is the doubling of halving of the amount of light let in by the camera). For example, if we make a panoramic that consists of 5 photos, with the sun in the first frame, we set our exposure in a way we’ll get a pleasing result, than if we move to the second photo, we adjust the exposure with 1/3 stop, the third photo will get 1/2 a stop, the fourth will get 2/3 and the fifth 1 full stop. This is just as an example, again, the best way is by checking every image. Of course, the difference in light is something natural and is a consequence of the sunrise, therefore part of the difference should be left untouched. Otherwise you will end up with a flat and unnatural looking image.
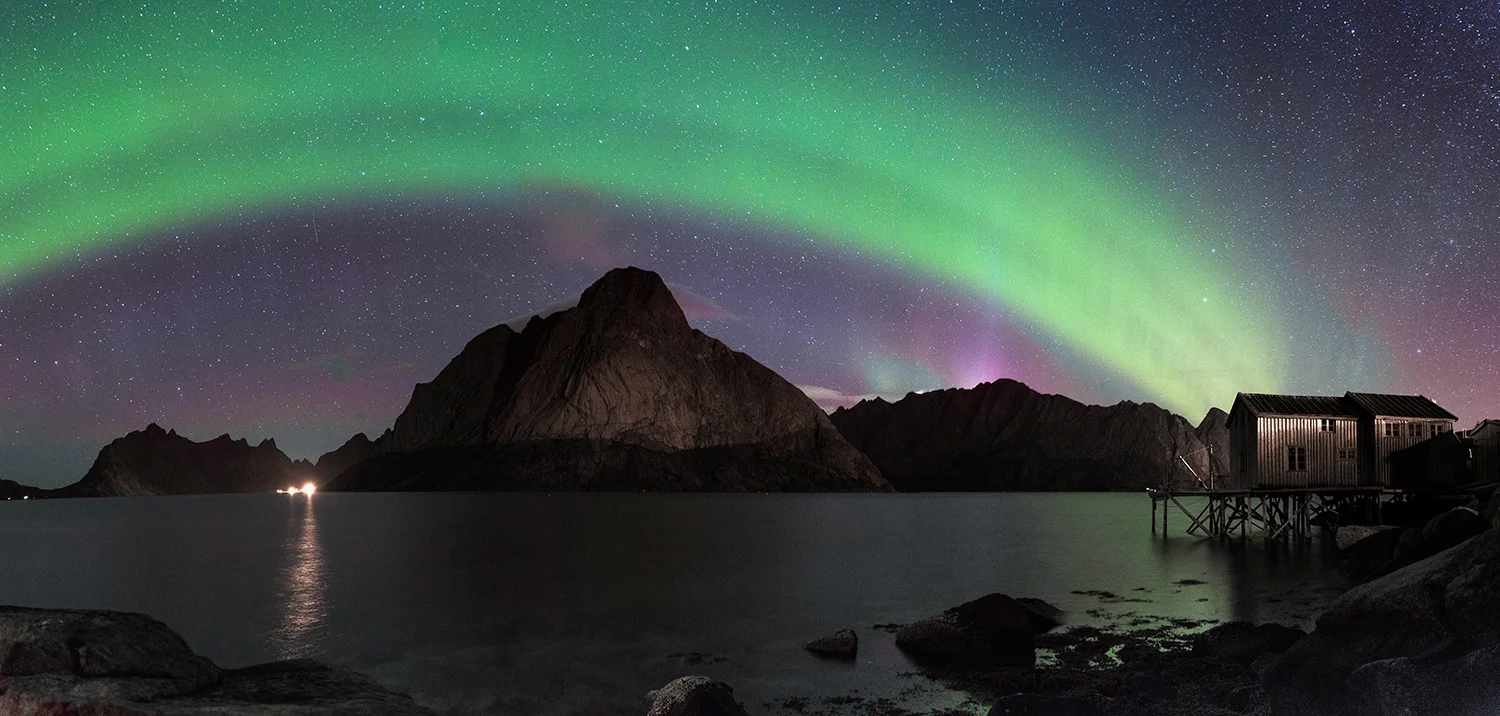
The night I took this photo, the aurora was quite boring. It didn’t move but just formed a large band in the sky (and a few flares behind the mountains). A single image of this scene was uninteresting, therefore I decided to shoot a panoramic photo. Five images shot with a Tamron SP 24-70 F/2.8 @ 24 mm | F/2.8 | 20 sec | ISO 2500
Focus
It sounds obvious but make sure that every single shot is in focus. It might be that when panning the camera, the foreground gets out of focus. If this is your main subject, than your panoramic is ruined. But also take notice of the wind. A panoramic consisting of long-exposure shots, can easily be ruined by camera movement. It would be a real pity if you get home, stitch your shots and discover that one of the images is softer than the others because of the wind. Furthermore, if plants (trees, reeds, flowers etc.) are in your frame and it is windy, they will become blurred.
The wind can cause another problem that can even be evident at lower shutter speeds. If the wind changes the shape of a tree for example, and this tree happens to be close where the frame gets stitched, an error will occur leaving an artifact in your panoramic shot. Wait for the wind to settle or make sure no movable objects are within the range of the stitched area.
Stitching
As I mentioned in the introduction, there is plenty of software (both free and paid) to do the stitching for you. I like to use Lightroom because it works in a convenient way and does an amazing job. It is really simple too. First you choose and edit the images you want to stitch. When editing for a panoramic, only stick to global adjustments first, then use synchronize to apply the settings to all the images, and manually adjust each image if necessary to make them fit perfectly. Lightroom will only use global adjustments when stichting. If you want to make local adjustments like a radial or graduated filter, you can do this after the image is stitched. Next you select all images you want to use and right-click one of them. Choose Photo Merge –> Panorama. Now you will see a dialogue box with 3 different projections, an option to auto crop, and a boundary warp slider. On the left side you’ll see the preview of your stitched panoramic.

Spherical
This projection stitches your image as if placed onto the inside of a sphere. Best option for really wide, multi-row and 360 panoramas.
Cylindrical
This projection stitches your image as if placed onto the inside of a cylinder. Best option for very wide panoramas. This option tries to keep vertical lines straight and works really well with landscape photography.
Perspective
This projection stitches your image as if was placed onto a flat surface. Tries to keep vertical lines straight and works best for architectural photography. Doesn’t work very well for very wide panoramas because it tends to distort the edges a lot.
After choosing the projection mode that fits best to your image, you can either choose the Auto Crop function (to crop the white edges off) or use Boundary Warp (to fill the frame by folding the edges). Press Merge when you are satisfied. Depending on the amount of photos and the size of the raw files this might take a while. The output file is a Digital Negative Raw file (DNG). This file can be edited like a normal Raw file. Now you can do local adjustments as well. For instance to remove small stitching errors or to brighten or darken the sky.